Filthy Lucre …

01


To say life reflects fiction is, in my case at least, not strictly true, However, to say life reflects the weather, well there you may just about have it down to a tee! In essence, it never just rains but it bleedin’ well thunders, hales and pisses it down … lol. In a nutshell, that horrid, horrid subject that the good old Brit finds uncomfortable, (me included), to discuss openly, is in desperately short supply. Yup, we are talking about the green stuff, the root of all evil, dough, dosh, *whispers with eyes lowered* money …. Let’s just say I am serious;y considering changing my middle name to something Grecian!

I am well aware that everyone is affected in one way or another by this financial downturn and sacrifices have to be made, but what happens when everything that can be ‘sacrificed’ has been and even then ends meeting is nowhere near? In essence, today is rent day, and my pockets are empty, I wont bore you with why, only to say it definitely isn’t self inflicted. As a non smoker, teetotaller, cut my own hair kind of gal, extravagance is not my forte, even my love affair with yarn has had to be curtailed (Oh, the pain!…lol) until the situation improves.

0aAnd here is where all you lovely, lovelies come into this uncomfortable equation. Today I launched a new pattern on Ravelry (soon to be followed onto Etsy and Craftsy) and it retails at £4.20. Once Mr Paypal, Mr Love Knitting or Mr Etsy take their cut, I end up with approximately £3.30 per pattern. By my very poor grasp of mathematics, I reckon that equates to 137 sales required to keep my Landlord in a good mood! As a special incentive to help me reach this target, I am offering to sell the new pattern direct to you at the cost price of £3.30 PLUS, one more pattern can be chosen from my Ravelry store, absolutely free. Just email me at wightstitches@gmail.com to place your order, and leave your preferred email address, I will invoice you by paypal (you do not need to be a paypal member) and your patterns will be available for immediate download once payment is received. As an extra thank you, I will be choosing one buyer to receive a special surprise gift. (yarn related obviously!)

So, Please Meet ‘Summersend’ … New Pattern Launch.

http://www.ravelry.com/patterns/library/summersend

This stylish hat and fingerless glove set was inspired by the gently curling leaves that are almost ready to abandon themselves to autumn…hence its name, Summer’s-End.

Both items are knitted seamlessly in the round, requiring only the very minimum of weaving in ends and tightening of the crown. Reverse stocking stitch gives a lovely warm and hard-wearing fabric whilst providing texture on the outside and a smooth cosy interior. The addition of seed/moss stitch in place of ribbing produces a stylish touch. Great to wear as a slouchy or fold up the brim for a classic look. I have chosen a good quality, 100% wool for durability and structure but it would be interesting to see how they look in softer yarns. When worn, the pretty leaves ‘unfurl’ and show themselves in their full glory. Suitable for intermediate knitters or confident beginners who have some experience in working in the round, either on circular needles or dpn’s and of the Magic Loop method. Please see the Ravelry post for more details.
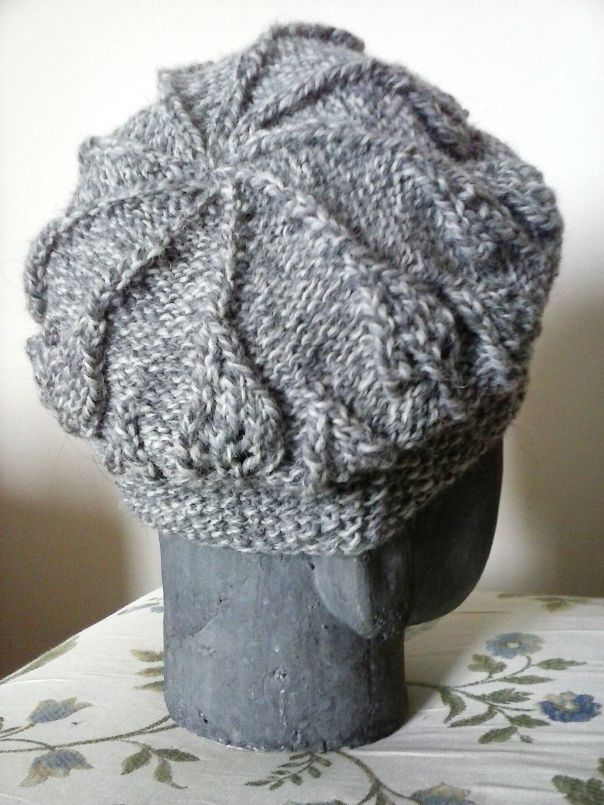
Shown with brim down as a slouchy, looks equally as good with brim folded for a more classic fit.

It occurs to me that I could have just put this as an Autumn offer without the background info but I think it matters to show how important your support is to me at a grass roots level, and, I’m sure, to many, many other artisans and independent designers. Money is a yucky subject, it somehow taints this wonderful fantasy we have of producing beautiful things solely from love and unicorn wishes, but we are all grown-ups (well, almost!) and the reality in being a designer is hard work, low pay and often times, a good pinch of being pretty lonely and isolated. Every comment, like and sale I ever receive always matters… really matters, and makes everything worthwhile. Thank you. And do please forgive the use of the nasty ‘M’ word, I shall go and wash my mouth out with soap immediately …

PS: If you are not a knitter (and why not may I ask?) 🙂 The very subtle (not!) donation button at the top of the page is fun to press, every penny/dollar/yen, is received with a big smile of gratitude … ❤ x

thank-you-card-with-daisy-flowers-shutterstock_141076960

Cosy Calves …

Pattern Launch

My latest (and long awaited, obviously, lol), knitting pattern.

Thistle Boot Cuffs.

Beautifully soft, stretchy and warm, these textured boot cuffs will be a valued addition to your winter wardrobe. They look equally as good with skirts or trousers and can be worn up high over the knees with long boots or lower down with ankle boots. Ring the changes by choosing which colour you would like to be dominant and wear that ribbing uppermost.

A pleasure to knit too, with an easily memorised pattern sequence, so a great mobile project.

BOOTCUFFS MINE I

Pattern to purchase in either my Ravelry, Craftsy or Etsy Store.

Critiques very welcome. thanks g

Happy Knitting.

Thursday’s Theme … (5)

Borders … Knitted

A pretty edge of bobbles. Can be sewn on or knitted on as you go.
A pretty edge of bobbles. Can be sewn on or knitted on as you go. Found Here.

Trims, borders, edgings … whichever name you prefer there is no denying that most baby blankets and throws look so much better with the addition of one to give a professional finish.

Knitted blankets can be edged with a knitted or crocheted border.

Squidgy garter stitch blankets made special by the pretty leaf border. Free Pattern Here.

There are three different methods used for attaching a knitted border. They can be knitted separately (narrow edge upwards) and then sewn on. Stitches can be picked up along each separate edge and knitted in the round as one piece. Or, the border can be added, again working from the narrow edge, by picking up a stitch from the finished item one row at a time.

How to knit a sewn on border.

Carefully measure around the total edge of your blanket and add an extra 2 inches to allow for curving round the corners. This is approximately how long you will need to knit your chosen pattern.

Once you are almost at the desired length, and starting close to one of the corners (the end to end seaming will be less noticeable here), carefully pin the border around the blanket. Allow it to gather a little at the corners but ensure it lays nice and flat along the sides.

Many instructions tell you to measure the remaining length of border required, unpick all the pins and continue knitting. Personally, after spending all that time pinning and getting my border to lay ‘just right’, I take the rebellious route and finish knitting with the border attached … just be careful of the pins!!

Once completed, cast off. Pin the short length of border you just finished and sew in place using the Mattress Stitch method. (If you were a sensible yarner and unpinned, you will need to re-pin the whole border again first!)

Neatly sew the border ends together and weave in any tails.

How to work a border by picking up stitches.

Using a long circular needle pick up and knit stitches around the entire edge of the blanket.  The usual rule is to pick up one stitch for each stitch along the top or bottom of the piece, and pick up three stitches for every four rows along the sides, but use your discretion for the best fit. Join work into the round and knit in your chosen pattern. NB: If not following a written pattern remember to increase one stitch at each corner, on every round as you work, so they lay flat. (Alternatively, increase two stitches on every other round, working one stitch either side of each corner).

Knit the border to the required depth and pattern. Cast off and weave in ends.

How to attach a knitted border one row at a time.

If making a narrow border, cast on the number of stitches required using your favoured method, if the border is wide, consider a provisional cast on for a neat finish.

Knit the first row of the pattern.

Knit the second row of the pattern and when you come to the last stitch in the row, knit it together with an edge stitch along the side of the finished blanket. (Have the right-side of the blanket uppermost and begin at the centre of one of the sides, not a corner).

Continue to knit the border pattern and on every right-side row, knit the last stitch together with the next edge stitch of the blanket.

Corners (If working a narrow border) *At the last stitch before the corner, on the right-side, knit a right-side row of the border, knitting the last stitch together with the edge stitch as before. Work a wrong side row. Repeat from *. Thus you are working two joining stitches into the same edge stitch. (If working a wide border, work three joining stitches into the same edge stitch). Work around the corner, making double or triple joins to achieve the effect you want. You may need to make alterations as you go to ensure the border lays flat or gathers in the way you want it to.

Once you have worked all around, cast off and either sew ends together neatly or join using Kitchener Stitch if you used a provisional cast on.


Borders can be deep and frilly, cabled, patterned or plain, used to provide coloured contrasts or made using a different texture entirely such as lace yarn or eyelash for a furry look. They can be made with eyelets to thread ribbon through, have fringing attached or just be a simple narrow trim of single crochet or garter stitch.

Left: Beautifully simple blanket in stocking stitch and edged with crochet shells in a contrast colour. Found Here (Etsy). Top Right: Pretty Ruffles to add in the round or sew on. Bottom Right: Gorgeous baby blanket. Purchasable pattern Here.
Left: Beautifully simple blanket in stocking stitch and edged with crochet shells in a contrast colour. Found Here (Etsy).
Top Right: Pretty Ruffles to add in the round or sew on. Free tutorial Here.
Bottom Right: Gorgeous baby blanket. Purchasable pattern Here.

The sky (and your imagination) is the only limit.  And of course all these methods and pretty trims aren’t just for blankets.

There is far too much gorgeousness out there for the one post, so do look out for more pretty knitted borders soon.

Next Week: Borders … Crocheted.

Happy Yarning … x

It’s All About Moi! …

illustration by advocate art

If you are fed up to the back teeth with being ‘promoted at’  over this season of ‘buy me, buy me NOW!’ advertising…then please amble away, pop the kettle on and pretend you never saw this post.

If, on the other hand, you love to make things for the little ones in your family and aren’t averse to supporting a poor independent designer, (subtle as a sledge hammer… lol) then please do peruse, pick and possibly purchase a pretty pattern! (too much?)   🙂

clip artbough-bell-bar-534x70


All available as instantly downloadable pdf’s.

Please click on the images to be whisked away to the store …..


Lydia is a Knitting Pattern for the perfect little pinafore dress…lovely over a long sleeve top and thick tights for cooler weather and will look just as good worn alone with sandals in spring and summer. Can be worn as a tunic over a skirt or trousers as they grow… so lots of wear from your stitching.0


Olivia is the prettiest of crocheted ponchos, with a difference. Cute cuffs make it far more practical than the traditional ‘free-flowing’ designs, but retains the lovely drape and comfort for which ponchos are renowned.Simply shaped by columns of gently curving clusters and easy increases, Olivia works up quickly and the lovely lacy hem and drawstring provides those special finishing touches that little girls love. Designed for a 2-3 yr old.

0


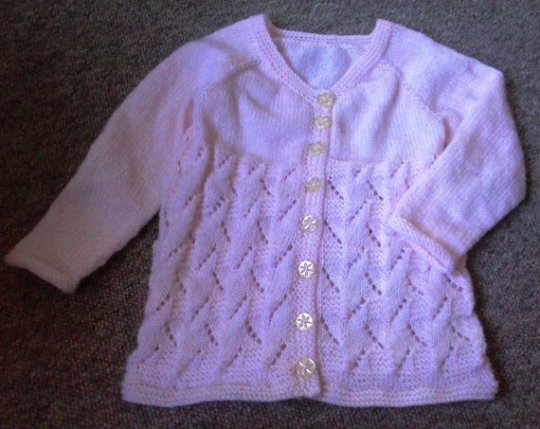
Chloe is a lovely versatile knitting design that can give so many different looks from the one pattern, and without any complicated calculations, just by changing the yarn and needle sizes. Choose long or short sleeves, variegated or plain yarn and matching or contrasting bands and you can achieve many different garments. 0Because of the construction of Chloe, it can also be made longer and worn as a dress or shorter and made into a bolero style jacket. Looks good buttoned up as a tunic over jeans or as a cardigan over a cotton summer frock. The pretty lace pattern isn’t too lacy and is very simple to work without being boring. A softly curled cuff and slightly flared hem add a stylish touch that means it is also flattering and a pleasure to wear.


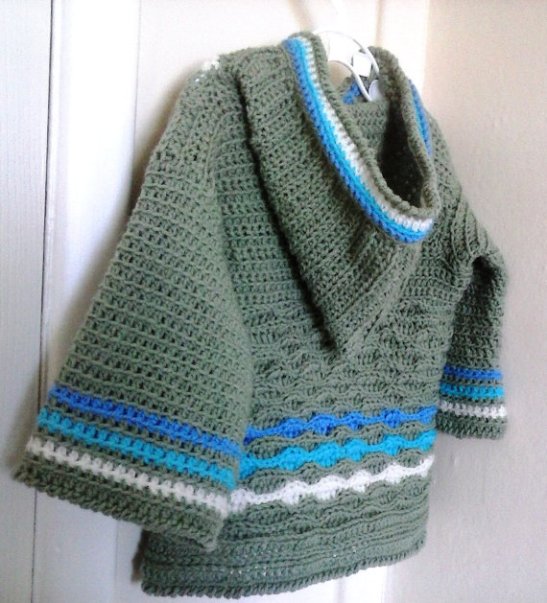
0Spindrift: (The spray blown from the crests of waves by the breeze) …The rolling waves and lush green Downs of the Isle of Wight inspired this lovely, crocheted, hooded jacket. Spindrift looks great on both boys and girls and would be wonderful in many different colour ways. Softly textured for a cosy feel and perfect to layer over a cotton t-shirt or pretty frock on cooler summer days.
Aimed at the intermediate maker or a very confident beginner.


Tillie is an adorable little short-sleeved frock for a 0-3 month old.. Perfect for parties, special occasions and every season. Looks lovely over a simple cotton vest for Spring and Summer or team with a pretty cardigan for cooler days. 0
The dress is softly flared and has a simple buttoned shoulder fastening for ease of dressing. A narrow satin ribbon decorates the waistline of the dress and ties at the back in a pretty bow and a simple buttoned flower adds the perfect finishing touch. Seen here in elegant French grey and pale pink, it would be equally as lovely in lilac/cream, deep lavender/pale sage or crimson and white for a festive look…(or indeed, any other combination you can imagine.) Crochet pattern.


A new collection of patterns for babies and children is planned for the spring which gives plenty of time for you to make these first…lol

If you have any questions or suggestions, please do comment & I shall endeavour to provide an answer (or a ‘witty’ retort!) … Just one of the great advantages of purchasing off someone you know 😉


Happy Yarning All…..

clip artbough-bell-bar-534x70

PS: One day I’ll have a better camera! 🙂

Meandering Mind…

Illustration by Michal Andrysiak

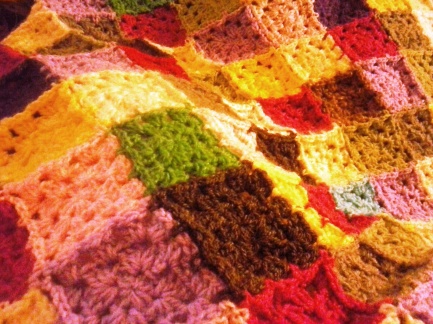
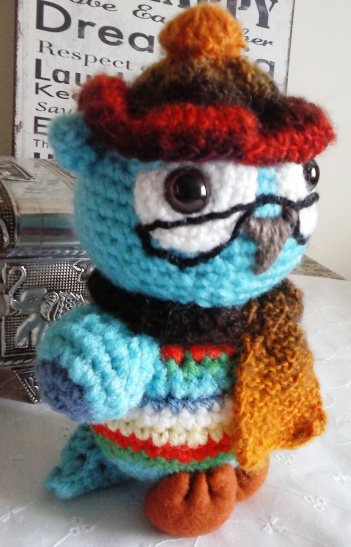
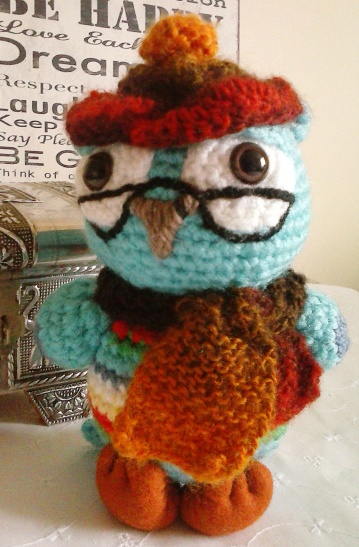
When I am happily working away at a project I often find my mind wandering to other things … Cake seems to be a common theme! I have read that authors, when busily engrossed in writing a book, get their best ideas for the next and wondered if other yarners experience the same. Take, for instance, the granny square blanket which is my ‘big’ project of the moment. (Poor picture taken at 5 am on phone!) 00 Whilst beavering away (and listening to the obligatory Radio 4 of course), I suddenly had the desire to make an owl! I Have no idea why, I don’t collect owls, I think the amigurumi world is saturated with owls and I get the feeling that owls are quickly being replaced by other trends … hedge-hogs seem to be flavour of the month as far as I can tell. But I didn’t have the thought of a hedge-hog pervading my limited brain … it was definitely an owl!! Christmas, as you don’t really need reminding (sorry!) is rapidly chasing us down and any sensible person would be concentrating on making some kind of dent into their ‘list’. Or … finish the project at hand, which really needs to be listed in their Etsy store and sold to help fund the yarns needed to start the denting… But, sensible (like normal) is vastly over-rated, lol… So, please, say hello to Otto! 🙂                                                                                                                                                                                                        OttoOtto


Turned out to be a rather studious little fellow. He is turquoise blue (obviously, what other colour would I choose for an owl?) and wears his pince-nez in a way that would make Poirot proud. Wrapped up in a soft scarf and jaunty titfer, Otto is a very cosy little owl indeed.

I loved making him, his big fat felt feet give me a particular sense of joy and I gave him a fan-tail (as real owls do have but are rarely seen on woolly ones) which means he stands sturdily… All 7.5 inches of him.Otto feet


Now I have dealt with the ‘owl itch’, I must get back to the granny squares … do I continue adding squares or should I do a deep stripy border? Will I ever get to my Christmas list or should I just immerse myself in battenburg?

Battenberg Cake Watch this Space … 😀

Please tell me I’m not the only one who’s mind meanders … ♥

PS: If you’d like to offer Otto a home, find him here.

Recipe for Battenberg cake here

My Pattern Gallery …

Wight Wedding 2
           Wight Wedding Shawl

Due to some valued feedback, It has been brought to my notice that it is difficult to find Wightstitches patterns, I thought the Etsy and Ravelry links would suffice but apparently peeps would prefer to be able to browse them here before wandering off and getting sucked into those ‘portholes of temptation’….


Wightstitches Patterns …  Gallery (One)

This slideshow requires JavaScript.

All patterns featured are lovingly designed, written, proof-read, tested and photographed by Lynn Hamps (Me!) ♥

I hope to encourage beginners and to inspire fibre experts too with beautiful projects for yourself, your home and the special people in your life.

Every pattern is listed as a pdf  document in my Etsy store and are available as immediate downloads, so no waiting to start that project you are hankering after …..

I toyed with the idea of direct buying from here but I trust the reliability of Etsy and thought that was the best solution for now.

Have a little browse through the gallery and if anything takes your fancy, the link below will whisk you away to the Wightstitches Etsy page, where you can read all the details and purchase if you desire.

Link to my Etsy Store
Link to my Etsy Store   https://www.etsy.com/uk/shop/Wightstitches