
Joining Squares
Sitting in front of you is a squidgy pile of beautiful, jewel like, squares. A feeling of justifiable pride glows from within and then you look at all the ends that need weaving in and the multiple sides that need marrying up … and go off and cast on your next project!
Please stop there … with a bit of pre-planning, turning all your hard work into that gorgeous baby blanket/afghan/bedspread isn’t as daunting as you fear.
Blocking: Some makers recommend joining the motifs together first and then blocking the finished piece, personally, I think you get much better results by doing it the other way round. Of course if you have chosen a ‘join as you go’ method (more details on that later), this isn’t possible and you will indeed need to block after. Whichever technique you choose, blocking is an essential step. Why do all that hard work and not make it look it’s best?… a seamstress wouldn’t sew a gorgeous gown and then not iron it!

Each square can be dampened and pinned out individually, ensuring all edges are straight or this very nifty method, using pencils or chopsticks pushed into a sturdy empty box, can be used. You simply add each finished square as you go.
TIP: Cover the top of the box with a plastic bag and a small piece of toweling (or flannel) to prevent it getting soggy.
Weaving Ends:
Knitted Squares: These are almost always sewn together, wrong sides of the squares are placed together and the appropriate side is neatly over-sewn. Two useful and time saving methods can be used.
1) Rather than knitting every square individually, knit strips of colour blocks, like long skinny scarves. Make sure you work the same number of rows per colour. Then sew these strips together, carefully lining up the squares.

2) If you prefer the individual squares method, always leave a long enough tail on each one after casting off. This will be your sewing up thread and negates extra weaving in. Wrapping the cast-on tail through the stitches of your first row is another time saver.
Crocheted Squares: Dozens of pretty or plain joining stitches are available. Pinterest is a great source as always. If you would like no demarcation line between your squares, they can of course be sewn in the same way as their knitted cousins, or simply joined with a seam of single crochet … working from the back or front of your piece will give two different looks. Again, it is easiest to first make long strips with the required number of squares and then join these strips together.
Seaming Stitches:
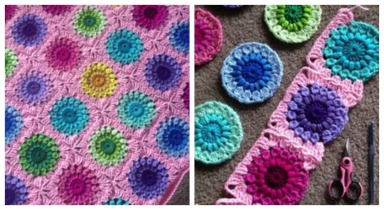
My very favourite method is the one I used in my heading photograph. Each square has the same colour as it’s final round, in this case white, and that same colour is used for the joining stitches. A fabulous tutorial for this method can be found Here. (I did consider doing my own but why try to replicate excellence?… lol)

Here I have chosen the simple single crochet method, working the stitches from the front to form a pretty raised border around each square.

Another option is this pretty braided look. Instructions can be found Here.

As promised, a lovely version of the ‘join as you go’ method. Another great tutorial Here.
Of course this is just a small selection of the seaming techniques available but whichever joining method you choose, enjoy it … take each step and stitch at a time and that fabulous throw will soon be completed and you can step back proudly as you gaze at the wonderful piece of art you have made.
Next Week… Hexagons & Borders.
Happy Yarning …

This makes me want to pick up a crochet hook. Maybe a big project blanket for 2015.
LikeLike
Thank you hunny 😀 … love to see it if you do! X
LikeLike